When my friend Bonnie told me she made this recipe and liked it, I told her I wanted to make it again just so I could take better photos! Bonnie was kind enough to say that she didn't think the old photos were that bad, but trust me, these new photos give you a much better idea of what a tasty recipe this is! This pot roast is just the thing to cook on low all day in the slow cooker while you're at work, and dinner will be ready when you get home.
I'm not a pot roast expert, but I've made pot roast in the Crockpot enough times to have strong opinions about how it should be done. There are three things I think are important to remember. First, Brown the meat well before you put it in the Crockpot because browning creates flavor. Second, don't use too much liquid for any crockpot cooking, but especially for pot roast. Third, be sure there is plenty of flavor in the liquids you're using. All day cooking can make foods bland if there isn't a flavorful liquid.
I'm using all those tricks in this pot roast recipe. If there are others reading this who use a slow cooker to make pot roast, chime in with some comments about good tips for making pot roast in the Crockpot.
I'm using all those tricks in this pot roast recipe. If there are others reading this who use a slow cooker to make pot roast, chime in with some comments about good tips for making pot roast in the Crockpot.
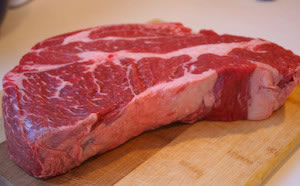 I used a very thick chuck roast from Costco. If you know anything about the South Beach Diet, you know that most of that fat has got to go. (South Beach guidelines specify not more than 10% fat.)
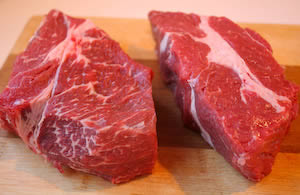 Here's how my roast looked after I trimmed it. There's still a big pocket of fat on one piece, but keep reading to see how I got rid of it. (I had to cut it in half to get it to fit in my Crockpot.)
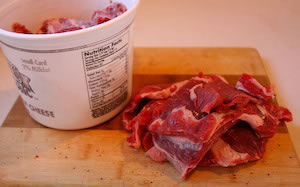 Of course, I save all the scraps in a container which goes in the freezer, and then use them to make beef stock.
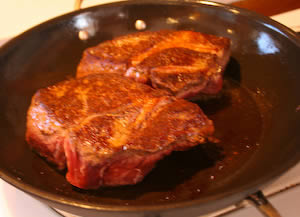 Rub meat on both sides with steak seasoning and black pepper, then brown the roast very well on both sides. Depending on your pan, you may need to use a little olive oil. In a small saucepan, reduce 1 cup beef stock to 1/2 cup.
 While the meat browns, cut the onions and put them in the Crockpot. In this recipe, the onions are partly to hold the meat up out of the sauce for most of the cooking time, so you want them to be quite thick.
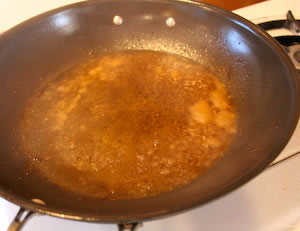 When the meat is brown put it in slow cooker on top of the onions, then deglaze the pan with 1/4 cup water, scraping off all browned bits, and add to reduced beef stock.
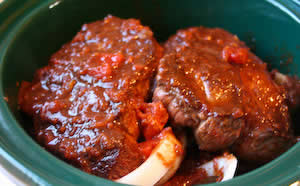 Add balsamic vinegar and tomato sauce to beef stock and pour over pot roast. Cook on low 6-8 hours, until meat is tender.
 I drained all the liquid from the Crockpot and used a fat separator like this to remove the fat. (This is too much liquid from my first attempt at the recipe; I reduced the amount in the recipe I'm giving you.) After the fat is removed, reduce the liquid by about 1/3 to make a sauce. You could thicken it, but I didn't think it needed it. You might think they'd be too done from being in the Crockpot all that time, but the onions were delicious as well as the meat.
 Balsamic and Onion Pot Roast in the Crockpot
(Makes about 6 servings, recipe created by Kalyn.)
I used a standard 3 1/2 quart Crockpot for this recipe.
3-4 pound boneless chuck roast
1-2 T steak rub (I used Szeged Steak Rub.)
black pepper to taste
1-2 T MCT oil (depends on your pan)
1/4 cup water to deglaze pan
2-3 large onions, peeled and thickly sliced
1 cup beef stock, reduced to 1/2 cup (can use a can of beef broth, but be sure to reduce it)
1/2 cup balsamic vinegar (I used Fini Balsamic Vinegar)
1/2 cup tomato sauce (You can substitute one can diced tomatoes, drained well. I might puree the tomatoes.)
Trim as much fat as you can from roast, and cut if necessary to fit into Crockpot. Rub meat well with steak seasoning and black pepper. Heat heavy pan with small amount of olive oil and brown roast well on both sides. This will take a few minutes; don't rush the browning step.
While roast browns put 1 cup beef stock in saucepan, bring to a boil and cook until reduced to 1/2 cup, then let cool slightly and mix in balsamic vinegar and tomato sauce. Peel onions and cut into thick slices. Deglaze pan with 1/4 cup water and add to sauce mixture.
(You can stop at this point and refrigerate browned roast, cut onions and mixed sauce ingredients and then put them in the Crockpot when you go to work in the morning. Don't refrigerate them in the crockery liner. Having the meat start out cold will add several hours to the cooking time, which will be good if you're cooking it all day while you're away.)
Place onions in bottom of Crockpot. Put meat on top of onions and pour beef stock mixture over. Set Crockpot to low and cook 6-8 hours, until beef is tender. The meat might be partly submerged in liquid after this much time. (If I am home, I might turn the meat once or twice.
Remove meat from crockpot and cover with foil to keep warm. Drain liquid from Crockpot and remove as much of the fat as you can with fat separator or skimmer. Cook down liquid by about 1/3, and serve sauce with meat and onions.
Note: If I wasn't making this for phase one, I might put some carrots in the bottom of the crockpot with the onions.
Found on this wonderful site:
Kalyn's Kitchen: How to Make Pot Roast in a Crockpot and Recipe for Balsamic and Onion Pot Roast